
An HPC cluster for the cheapest of cheapskates
This proves I have too much time on my hands, but I thought it would be fun to setup a small test cluster using the Amazon Web Services free instances. If you’re designing a semiconductor or analyzing airflow over an aircraft wing this is not the best solution. If you’re on a budget however and wanting to learn and experiment with some cool concepts you’ve come to the right place. Excuse the length of this post. Did I mention this is free?
For readers not familiar with the AWS Free Tier, it is designed to enable users to get experience with AWS at no charge for up to 12 months. You can run Amazon a single t2.micro Linux instances for up to 750 instance-hours per month. This means that a three node cluster can be up and running for 10 days continuously each month or 30 days if only run for 8 hours – more than enough for my needs. While you can hardly call three t2.micro machine instances an HPC environment, it’s a useful sandbox to test concepts and get familiar with different cluster management tools and programming approaches.
I’m a fan of Platform LSF offered by IBM, so I decided to center this example around OpenLava, an open-source fork of an earlier version of LSF. While less capable than LSF, it’s for the most part compatible and fine for small and even medium sized clusters. The steps involved in deploying AWS hosts and installing the software are detailed below.
Sign-up for a free AWS account
Signing up for a free account is straightforward, so I won’t bother going through all the steps here. You can visit http://aws.amazon.com/free and follow the directions. You will need to enter your credit card information (so Amazon can charge you if you exceed maximums around hours, storage or bandwidth) but as long as you remember to stop the cluster nodes after a few days there should be no issue with cost. You will also need validate your identify and phone number through an automated process.
Provision the AWS EC2 Nodes
I’ll go over this part quickly as wellbecause the Amazon web interface makes this simple. There are lots of blogs and tutorials out there about Amazon EC2, the service we use in this example. You will need to login into the AWS account you created above and select EC2 (virtual servers in the cloud) in the Compute section of the AWS main screen. From there you’ll want to provision a machine in the cloud.
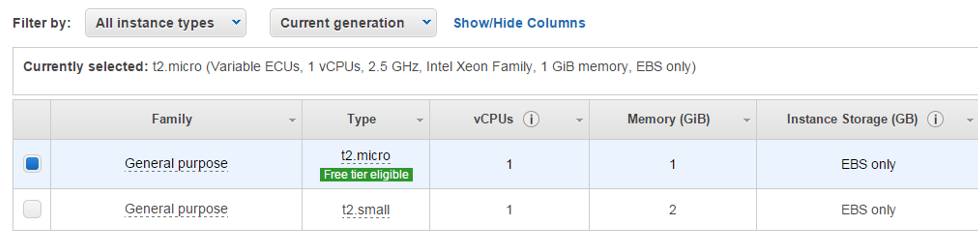
If you want to follow the same steps as I did, you will first need to select an operating system to deploy. I used the Ubuntu Server 14.04 machine image (below) because it is eligible for use for free. You can select other free operating systems, but these instructions pertain specifically to this Ubuntu OS.
 Next you need to select the type of Amazon virtual machine to run the operating system on. Make sure that you choose the t2.micro instance. It provides a 2.5 GHz processor and one GB of memory – perfectly fine for a small Linux machine. The free t2.micro machines support only Elastic Block Storage (block-oriented storage in the Amazon cloud) but again, this is fine for our purposes.
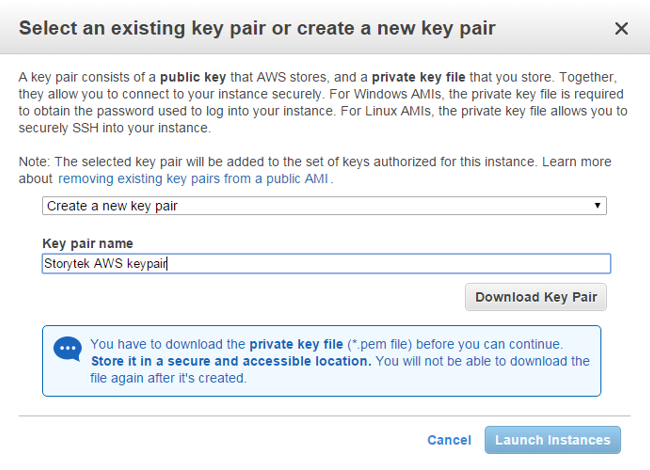
 In order to provide secure access to your machine on AWS, you will be asked to create a key pair. You will download the private key in a .pem file and the public key will be stored up on AWS.
The interface below is used to generate and download your .pem file. The file stores your private key as a BASE64 encoded X.509 certificate. In case you’re wondering, the term “PEM” comes from the application of X.509 certificates to Privacy-enhanced E-Mail.
 You will need to reference the downloaded .pem file when connecting to the public IP address or public DNS name of your AWS host machines as in the example below. You can use free ssh tools like Putty to connect as well, but I won’t bother describing the Putty setup here. In my example my local Linux node is called “master” (part of a small cluster I have at home). You can use the same PEM private key to access multiple machine instances in the cloud. I stored the file along with other credentials in the .ssh directory in $HOME on the Linux client. A command like the one below can be used to reference the private key when connecting as user ubuntu to the public IP address of the server.
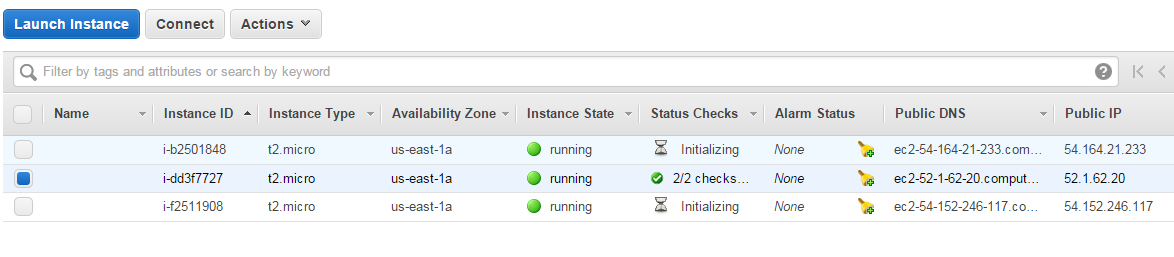
[root@master ~]# ssh -i ./.ssh/storytek.pem ubuntu@52.1.62.20After answering a few more questions, your instance will show up in the EC2 dashboard. When viewing your machine instances you can use the “Actions” menu across the top of the dashboard and select the command “Launch More Like This” to quickly launch addition nodes. This is allows you to create two (or more) additional virtual machines with the same characteristics. I used this approach to “clone” my initial machine and create two other identical machines running the same operating environment and the same machine instance type.
In my three node cluster. the cluster node with public IP address 52.1.62.20 was the first one I created and then used it to clone the other two. This is why the first node is fully up and running that the other two are still initializing at the time the screen capture below was taken. Because I created 52.1.62.20 first, I arbitrarily viewed it as the “master node” for the cloud-based cluster we’ll build in subsequent steps.
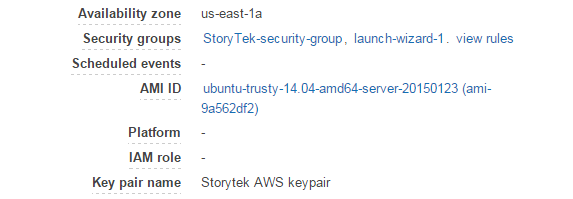
 Selecting one of you machine instances (when running) shows all the details about the machine including public DNS and IP addresses as well as private DNS and IP addresses. It can get confusing with multiple ways to reference the same machine so I recommend recording your machine instance IDs and the associated IP addresses and node names.
When you stop and re-start instances of the free tier machines on Amazon, your Public IP address will change. When configuring your cluster you will want to use the Private IP addresses as shown below. In my case the three Private IP addresses and Private DNS names referring to my three machines instances were as follows. The examples below assume that these three nodes comprise my cluster.
i-dd3f7727 – 172.31.37.172 - ip-172-31-37-172 (my master node on the cluster)
i-b2501848 - 172.31.45.119 - ip-172-31-45-119
i-f2511908 - 172.31.42.222 - ip-172-31-42-222
Setup a Security Group
This is an important step. By default, your nodes will not be able to see one another on the network unless you place them in a common security group and control what ports are open. From the AWS Dashboard you can access Security Groups under the NETWORK & SECURITY area of the left panel.
In the figure below you can see that I created my own security group called StoryTek (named for my small business). When you configure your security group you will have the option to select tabs and create rules for both Inbound Outbound traffic. Since this is just a test cluster, I recommend allowing “All traffic” to make troubleshooting easier. The Type should be set too “All”, Protocol to “All”, Port Range to “All” and source set to 0.0.0.0 on both the Inbound and Outbound tabs. This will avoid Amazon’s firewalls getting in the way. Setting up Linux networking can be tricky enough without external firewalls blocking communication.
 After you’ve created a security group with relaxed permissions as above, return to the machine instances view, and make sure that you associate your machine instances with the newly created security group. This is done under “Actions” / “Networking” / “Change Security Groups”. In the security group settings for each of your cluster nodes, you should see that they are part of the new security group as below:
This step above is essential. Otherwise you will not be able to connect from one host to another. Once you do this you should be able to logon to any of your three hosts and “ping” the private IP address or private DNS name of other nodes that will be in your cluster.
Preparing the Master Host
The next step is to prepare our master host. From your client machine, connect to the public IP or public DNS address of the AWS host you provisioned first. In my case this is 52.1.61.20. You’ll need to use the private certificate stored in the .pem file to as described earlier.
[root@master ~]# ssh -i ./.ssh/storytek.pem ubuntu@52.1.62.20
Welcome to Ubuntu 14.04.1 LTS (GNU/Linux 3.13.0-44-generic x86_64)
* Documentation: https://help.ubuntu.com/
System information as of Fri Mar 6 16:48:52 UTC 2015
System load: 0.0             Processes:           97
Usage of /:   9.8% of 7.74GB   Users logged in:     0
Memory usage: 5%               IP address for eth0: 172.31.37.172
Swap usage:   0%
..
ubuntu@ip-172-31-37-172:~$
For those familiar with Ubuntu, a root password is not set by default. Users normally use sudo when they need to run commands as root. For people like me who are more familiar with CentOS or RedHat, I prefer to set a root password so I can run a shell as root. This will help us later on when we need to perform operations as root across the cluster. To set a root password execute the following commands logged in as the default user ubuntu.
ubuntu@ip-172-31-37-172:~$ sudo usermod root -p password
ubuntu@ip-172-31-37-172:~$ sudo passwd root
Enter new UNIX password:
Retype new UNIX password:
passwd: password updated successfully
ubuntu@ip-172-31-37-172:~$
Make sure you remember your root password. For simplicity I set the same root password on each of the three cluster hosts. With these commands executed you can use the command su – root to get root credentials on your cloud based master host.
Install OpenLava
There are several ways to install OpenLava. Source code is available from http://openlava.org. You can also obtain a pre-compiled RPM (for RedHat and CentOS) and now also a Debian package from Teraproc (http://teraproc.com). At the time I installed my cluster only an RPM was available however Teraproc now provides a Debian package as well. If you are installing and compiling from source code, follow the quickstart directions at http://www.openlava.org/documentation/quickstart.html.
Otherwise, download the OpenLava RPM or DEB by visiting http://teraproc.com , registering and downloading the appropriate file. Once you have the file, you can copy it from your client machine to the master node on AWS using scp. As with ssh you will need to use your private key to copy the file up to the master host.
[root@master ~]# scp -i ./.ssh/storytek.pem openlava-2.2.1.x86_64.rpm ubuntu@52.1.62.20:/tmp/openlava-2.2.1.x86_64.rpm
openlava2.2.1.x86_64.rpm            100% 3236KB   3.2MB/s   00:01
[root@master ~]#
The command above moves the openlava RPM to the /tmp directory on the master AWS host. Now we should ssh back into the host, convert the RPM to a Debian install package (using a tool called alien) and install OpenLava. If you already have a Debian package that’s the better approach and you won’t need to to use alian.
To install alien and convert the RPM to a DEB file (as I needed to) execute the commands below. These commands are executed from the master node as root.
The dpkg command is used to install OpenLava once it is in Debian package format.
root@ip-172-31-37-172:~# apt-get update
root@ip-172-31-37-172:~# apt-get install alien
root@ip-172-31-37-172:~# cd /tmp
root@ip-172-31-37-172:/tmp# ls
openlava-2.2.1.x86_64.rpm
root@ip-172-31-37-172:/tmp# alien --scripts openlava-2.2.1.x86_64.rpm
openlava_2.2-2_amd64.deb generated
root@ip-172-31-37-172:/tmp# dpkg -i openlava_2.2-2_amd64.deb
Selecting previously unselected package openlava.
(Reading database ... 56934 files and directories currently installed.)
Preparing to unpack openlava_2.2-2_amd64.deb ...
Unpacking openlava (2.2-2) ...
Setting up openlava (2.2-2) ...
root@ip-172-31-37-172:/tmp#
Start a single node cluster in the cloud
If the commands above all executed successfully, you should now have OpenLava installed in /etc/openlava-2.2 (depending on the version of OpenLava you downloaded) on your cloud resident master host. Before we starting adding more hosts to the cluster, in the interests of troubleshooting problems one step at a type, we start the cluster and make sure it is working with just a single node.
The first step is to edit the lsf.cluster.openlava file installed in /opt/openlava-2-2/etc. You will need to enter the hostname of your cluster. Your default hostname is the same as your Private DNS address. Just type “hostname” if you are not sure. The Amazon hostnames are pretty simple as they just mirror the private IP address. In our case the private hostname is ip-172-31-37-172
root@ip-172-31-37-172:/opt/openlava-2.2/etc# vi lsf.cluster.openlava
#-----------------------------------------------------------------------
# T H I S I S A O N E P E R C L U S T E R F I L E
#
# This is a sample cluster definition file. There is a cluster
# definition file for each cluster. This file's name should be
# lsf.cluster.<cluster-name>.
# See lsf.cluster(5) and the "LSF Administrator's Guide".
#
Begin ClusterAdmins
Administrators = openlava
End ClusterAdmins

Begin Host
HOSTNAME model type server r1m RESOURCES
ip-172-31-37-172 IntelI5 linux 1 3.5 (cs)
End Host

Begin ResourceMap
RESOURCENAME LOCATION
# tmp2 [default]
# nio [all]
# console [default]
End ResourceMap
Create the openlava user account
Next, while logged in as root on the master node we add users, load necessary software libraries and start the cluster.
root@ip-172-31-37-172:~# useradd -r openlava
root@ip-172-31-37-172:~# chown -R openlava:openlava /opt/openlava-2.2
root@ip-172-31-37-172:~# cp /opt/openlava-2.2/etc/openlava /etc/init.d
root@ip-172-31-37-172:~# cp /opt/openlava-2.2/etc/openlava.* /etc/profile.d
I learned during installation that OpenLava wants to see TCL8.5 installed (libtcl8.5.so) and this was not installed by default in our Ubuntu server environment. To remedy this, before attempting to start OpenLava, install TCL 8.5.
root@ip-172-31-37-172:~# apt-get install tcl8.5
Reading package lists... Done
Building dependency tree
Reading state information... Done
The following extra packages will be installed:
<content omitted here for brevity>
Setting up tcl8.5 (8.5.15-2ubuntu1) ...
Processing triggers for libc-bin (2.19-0ubuntu6.5) ...
root@ip-172-31-37-172:~#
Now that TCL is installed, we should be able to start OpenLava without any issues. You can read about the functions of lim, res and sbatchd at OpenLava.org. These will be very to LSF cluster administrators.
root@ip-172-31-37-172:~# service openlava start
Starting daemons...
lim started
res started
sbatchd started
root@ip-172-31-37-172:~#
Before we can execute OpenLava commands, we need to source the shell file that sets our environment. It makes sense to add this to the .profile, .bashrc or .cshrc in your home directory depending on the shell you are running. After sourcing the environment you should be able to run basic commands like lsid and lsload to see your one node cluster.
root@ip-172-31-37-172:~# cd /etc/profile.d
root@ip-172-31-37-172:/etc/profile.d# ls
bash_completion.sh openlava.csh openlava.sh Z97-byobu.sh Z99-cloud-locale-test.sh
root@ip-172-31-37-172:/etc/profile.d# . ./openlava.sh
root@ip-172-31-37-172:/opt/profile.d# lsid
openlava project 2.2, Nov 6 2014
My cluster name is openlava
My master name is ip-172-31-37-172
root@ip-172-31-37-172:/opt/openlava-2.2/etc#
root@ip-172-31-37-172:/opt/openlava-2.2/etc#
root@ip-172-31-37-172:/opt/openlava-2.2/etc# lsload
HOST_NAME       status r15s   r1m r15m   ut   pg ls   it   tmp   swp   mem
ip-172-31-37-17     ok   0.0   0.0   0.1   0%   0.0   1     8 6500M   0M 882M
root@ip-172-31-37-172:/etc/profile.d#
Expanding the cluster to include more nodes
On the master node, edit the file /opt/openlava-2-2/etc/lsf.cluster.openlava to reflect the additional nodes. List the private node names of your additional cluster nodes as shown below.
#-----------------------------------------------------------------------
# T H I S I S A O N E P E R C L U S T E R F I L E
#
# This is a sample cluster definition file. There is a cluster
# definition file for each cluster. This file's name should be
# lsf.cluster.<cluster-name>.
# See lsf.cluster(5) and the "LSF Administrator's Guide".
#

Begin ClusterAdmins
Administrators = openlava
End ClusterAdmins

Begin Host
HOSTNAME model type server r1m RESOURCES
ip-172-31-37-172 IntelI5 linux 1 3.5 (cs)
ip-172-31-45-119 IntelI5 linux 1 3.5 (cs)
ip-172-31-42-222 IntelI5 linux 1 3.5 (cs)
End Host

Begin ResourceMap
RESOURCENAME LOCATION
# tmp2 [default]
# nio [all]
# console [default]
End ResourceMap
Setting up Password-less SSH between nodes
You’ll want to setup password-less ssh so that you can roam freely between cluster nodes and easily execute commands across the whole cluster. Setting this up can be a little tricky, but a short recipe that should work is provided below.
On the master cluster node logged in as root, execute the following commands. Enter a null passphrase by pressing enter.
root@ip-172-31-37-172:~# ssh-keygen -t rsa
Generating public/private rsa key pair.
Enter file in which to save the key (/root/.ssh/id_rsa):
Enter passphrase (empty for no passphrase):
Enter same passphrase again:
Your identification has been saved in /root/.ssh/id_rsa.
Your public key has been saved in /root/.ssh/id_rsa.pub.
The key fingerprint is:
3b:b0:d0:3e:4e:ce:ee:15:fd:21:ec:d8:b7:80:b1:04 root@ip-172-31-37-172
The key's randomart image is:
+--[ RSA 2048]----+
| |
| |
| E |
| . . o |
| . o S + . |
| o + X o . |
| = B + o |
| = o . o . |
| o* . |
+-----------------+
This will generate two files in the users home directory under a hidden directory called .ssh. The files will be your private key (id_rsa) and your public key (id_rsa.pub).
Copy the contents of the public key file (id_rsa.pub) into the authorized_keys file on each host in the cluster that you want to be able to login to without a password (including the master host that you are presently logged into). You may have multiple authorized_keys so be careful not to overwrite keys that are already in the file.
When you are done, the authorized_keys file in /root/.ssh will look something like the file below. The public key for the host that is being allowed to login is added to the file and is shown in bold.
no-port-forwarding,no-agent-forwarding,no-X11-forwarding,command="echo 'Please login as the user \"ubuntu\" rather than the user \"root\".';echo;sleep 10" ssh-rsa AAAAB3NzaC1yc2EAAAADAQABAAABAQCSkRO0mOAEzPpzN4V2D+uPkDndUVSuS2iYgOktYOdaFg/0WaJmSfmaL4O0ME8Lk3ImeMQr+LJXsQUQ1AI09xmjcK51QbYm5oTIWU3/+8FlF0ovp5irVFnZ3VXsH0nwhwctypMfUjMWVl149FgJ1RuJ92g9YxGX+z8LWu1z5B69k2yNNzls/DrNxpfbBfHoflXoBMFDqCd/TiaytIg0k4L4/sgurYS27lmOkrApYHQgD2QqCW20UdDANp7DFPKinkfxSnYNJGaTMql1ER4ED0Bh9fMCdACdrmtjut621eC2ui56WlcPfB6Zl99j89+BskKHjOCBk7KXEU+FDcDtXHfL Storytek AWS keypair

ssh-rsa AAAAB3NzaC1yc2EAAAADAQABAAABAQCWiWIz8djSKRJzGXRB414GCQ4NuNMAvzpMv1aqc5V6SPbsWbjt9LB5SNyJ2u53Tjaqp7I/WeMLHaEqwCbu4O96/hI9u9LW3lVn2y737bN1jhMlSu+VrtILGoHB3eRLw4yaF2iuKra73CtAtIcRuRPgJTogQ6PfqQ4O4h2BtXKWbRZTJBx76BXlyDNPr2uA7zIo1uULrOCYi3ARo1FdqJNqeQKi8vHsMff2emHu21D56Iox/c8XmHMwlIZNlA/PqdTbuhHjkv10qfA/s2breoQQcpBirQquXbueqqTZsbdsiSRcES8Y5FzL0diQy8zzHsSCF3yPyFll11FbY1t+5yyb root@ip-172-31-37-172
You’ll need to similarly update the authorized_keys file in the /root/.ssh directory on the other cluster host. Note that this procedure only allows the master host to ssh without a password to the other hosts. If you want to have password-less ssh setup between all of your three hosts, you’ll need to repeat this process for each node in the cluster.
The next step is to package up the needed OpenLava binaries and distribute them to the other cluster nodes so we can expand from a one node cluster to a three node cluster. Use the command below to build the tar-file. Ignore the messaging about removing the leading “/” – just make sure that you untar this file relative to the root on the other cluster nodes.
root@ip-172-31-37-172:~# tar cf openlava-bin.tar /opt/openlava-2.2 /etc/init.d/openlava /etc/profile.d/openlava.*
tar: Removing leading `/' from member names
Create a text file called compute_hosts. This will include the private DNS names of your two compute hosts excluding the master host where OpenLava is already installed. If you have only two hosts it is debatable whether this step makes sense. If you have 50 hosts however, you’ll definitely want to follow this approach because it can save a lot of work.
root@ip-172-31-37-172:~# cat compute_hosts
ip-172-31-45-119
ip-172-31-42-222
Create a script to copy and install the lava files on the cluster compute hosts. A script tested for this purpose is below. It provides a few other housekeeping functions like installing tc8.5 as described above, creating the openlava user account and setting ownership of the OpenLava files as well as starting OpenLava on the remote hosts.
#!/bin/bash
for host in `cat compute_hosts`
do
scp openlava-bin.tar $host:/root
ssh $host "cd /;tar xf /root/openlava-bin.tar"
ssh $host "apt-get install tcl8.5"
ssh $host "useradd -r openlava"
ssh $host "chown -R openlava:openlava /opt/openlava-2.2"
ssh $host service openlava start
done
You’ll need to make the script executable as below
root@ip-172-31-37-172:~# chmod 777 copy_files.sh
Next, run the script as root from the master host.
root@ip-172-31-37-172:~# ./copy_files.sh
openlava-bin.tar 100% 16MB 15.6MB/s 00
Reading package lists...
Building dependency tree...
Reading state information...
tcl8.5 is already the newest version.
0 upgraded, 0 newly installed, 0 to remove and 0 not upgraded.
Starting daemons...
lim started
res started
sbatchd started
openlava-bin.tar 100% 16MB 15.6MB/s 00
Reading package lists...
Building dependency tree...
Reading state information...
tcl8.5 is already the newest version.
0 upgraded, 0 newly installed, 0 to remove and 0 not upgraded.
Starting daemons...
lim started
res started
sbatchd started
Next, I restarted OpenLava on the master node to make sure that the updated cluster configuration file was read.
root@ip-172-31-37-172:~# service openlava stop
Stopping daemons...
root@ip-172-31-37-172:~# service openlava start
Starting daemons...
lim started
res started
sbatchd started
root@ip-172-31-37-172:~#
Make sure that OpenLava is working
With any luck, your three node cluster should now be ready for use. Use lshosts to make sure that all of the clusters are up and running and that the lim process on each is reachable.
root@ip-172-31-37-172:~# lshosts
HOST_NAME type model cpuf ncpus maxmem maxswp server RESOURCES
ip-172-31-3 linux IntelI5 100.0 1 992M - Yes (cs)
ip-172-31-4 linux IntelI5 100.0 1 992M - Yes (cs)
ip-172-31-4 linux IntelI5 100.0 1 992M - Yes (cs)
root@ip-172-31-37-172:~#
The bhosts command validates that the batch services are running on all nodes and that the cluster nodes are ready to receive jobs
root@ip-172-31-37-172:~# bhosts
HOST_NAME STATUS JL/U MAX NJOBS RUN SSUSP USUSP RSV
ip-172-31-37-172 ok - 1 0 0 0 0 0
ip-172-31-42-222 ok - 1 0 0 0 0 0
ip-172-31-45-119 ok - 1 0 0 0 0 0
We can run a sample job through the scheduler – in this example run a job that simply sleeps for 100 seconds. We can then use the bjobs command to see the cluster node that the job has been dispatched to and its status.
ubuntu@ip-172-31-37-172:~$ bsub sleep 100
Job is submitted to default queue .
ubuntu@ip-172-31-37-172:~$
ubuntu@ip-172-31-37-172:~$
ubuntu@ip-172-31-37-172:~$
ubuntu@ip-172-31-37-172:~$ bjobs
JOBID USER STAT QUEUE FROM_HOST EXEC_HOST JOB_NAME SUBMIT_TIME
102 ubuntu RUN normal ip-172-31-3 ip-172-31-4 sleep 100 Mar 6 18:38
ubuntu@ip-172-31-37-172:~$
The whole point of having a cluster is to be able to run workloads in parallel, so run a similar command that submits an array of 100 jobs that will each execute for ten seconds. Our simple three node cluster can execute this workload three times faster than would be possible on a single node. A 100 node cluster could complete the work 100 times faster. You get the idea.
ubuntu@ip-172-31-37-172:~$ bsub -J "sampleArray[1-100]" sleep 10
Job is submitted to default queue .
ubuntu@ip-172-31-37-172:~$
We can use bjobs to monitor the project of our 100 related jobs in the job array
ubuntu@ip-172-31-37-172:~$ bjobs
JOBID USER STAT QUEUE FROM_HOST EXEC_HOST JOB_NAME SUBMIT_TIME
102 ubuntu RUN normal ip-172-31-3 ip-172-31-4 sleep 100 Mar 6 18:38
103 ubuntu RUN normal ip-172-31-3 ip-172-31-4 *eArray[1] Mar 6 18:39
103 ubuntu RUN normal ip-172-31-3 ip-172-31-3 *eArray[2] Mar 6 18:39
103 ubuntu PEND normal ip-172-31-3 *eArray[3] Mar 6 18:39
103 ubuntu PEND normal ip-172-31-3 *eArray[4] Mar 6 18:39
103 ubuntu PEND normal ip-172-31-3 *eArray[5] Mar 6 18:39
103 ubuntu PEND normal ip-172-31-3 *eArray[6] Mar 6 18:39
103 ubuntu PEND normal ip-172-31-3 *eArray[7] Mar 6 18:39
103 ubuntu PEND normal ip-172-31-3 *eArray[8] Mar 6 18:39
103 ubuntu PEND normal ip-172-31-3 *eArray[9] Mar 6 18:39
103 ubuntu PEND normal ip-172-31-3 *Array[10] Mar 6 18:39
103 ubuntu PEND normal ip-172-31-3 *Array[11] Mar 6 18:39
103 ubuntu PEND normal ip-172-31-3 *Array[12] Mar 6 18:39
103 ubuntu PEND normal ip-172-31-3 *Array[13] Mar 6 18:39
103 ubuntu PEND normal ip-172-31-3 *Array[14] Mar 6 18:39
103 ubuntu PEND normal ip-172-31-3 *Array[15] Mar 6 18:39
103 ubuntu PEND normal ip-172-31-3 *Array[16] Mar 6 18:39
103 ubuntu PEND normal ip-172-31-3 *Array[17] Mar 6 18:39
103 ubuntu PEND normal ip-172-31-3 *Array[18] Mar 6 18:39
103 ubuntu PEND normal ip-172-31-3 *Array[19] Mar 6 18:39
103 ubuntu PEND normal ip-172-31-3 *Array[20] Mar 6 18:39
103 ubuntu PEND normal ip-172-31-3 *Array[21] Mar 6 18:39
103 ubuntu PEND normal ip-172-31-3 *Array[22] Mar 6 18:39
103 ubuntu PEND normal ip-172-31-3 *Array[23] Mar 6 18:39
103 ubuntu PEND normal ip-172-31-3 *Array[24] Mar 6 18:39
103 ubuntu PEND normal ip-172-31-3 *Array[25] Mar 6 18:39
103 ubuntu PEND normal ip-172-31-3 *Array[26] Mar 6 18:39
103 ubuntu PEND normal ip-172-31-3 *Array[27] Mar 6 18:39
Poof! you’re done!
Congratulations if you made it this far. Clearly there is more to be done. We haven’t discussed adding users, NFS filesystems or adding packages like OpenMPI. Hopefully you now have a cluster that you can get started with to get familiar with cluster management and workload management concepts.
In future posts I’ll show an even easier way to setup a free or low cost cluster and start to layer in concepts like MPI, R and Hadoop workloads.
I’d be interested in hearing from you if you were able to make this work or ran into problems.